Archives

The benefits of a flatpack kitchen

flatpack-kitchen
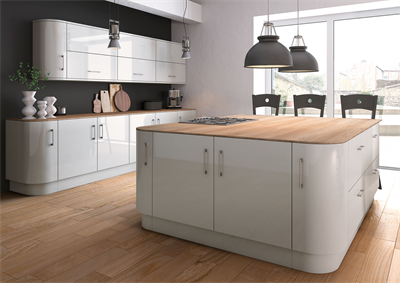
When it comes to buying a new kitchen, to what extent are you prepared to do it yourself? If you’re weighing up the pros and cons of a rigid kitchen v a flatpack kitchen, the latter might be an easier option than you think!

There are many myths around flatpack kitchens, such as them being of a lesser quality than pre-assembled kitchens and not giving the professional finish you expect. But these misconceptions just aren’t true, and buying a flatpack kitchen can be a fabulous way of getting the bespoke kitchen you want at a price you can afford!

A recent blog post from our sister company Flatpack Kitchens listed some of the benefits of buying a flatpack kitchen. You can read the whole post here or take a look at our synopsis, which sorts out the flatpack facts from the kitchen fiction!

The benefits of a flatpack kitchen include:

  • A cheaper price tag, which means you get more for your money
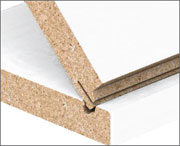
  • The same quality as rigid kitchens. ItÔÇÖs the material they are made from that counts, not how they are delivered
  • Easier storage until you’re ready to install your new kitchen
  • Easier to fit around pipework and other features
  • With many kitchen retailers, you will be able change your order after it’s been processed. You’re less likely to be able to with a bespoke kitchen

flatpack-kitchenWhen installing your new flatpack kitchen, read the manufacturer’s instructions thoroughly, even if you’re an experienced fitter. Kitchen technology and materials are changing all the time, and the fittings might contain some quirks you haven’t seen before!

Even if you don’t consider yourself up to the task of fitting a new kitchen, flatpack cabinets are not to be discounted. You can buy a flatpack kitchen anyway and use the savings you make to pay a professional to do the job for you!

Replacement Kitchen Doors

Don’t forget that once you’ve got the cabinets in place head over to get new doors – there are a huge selection of replacement kitchen doors available to buy to finish your renovation programme.┬á

How to restore wooden garden furniture

garden-bench

WeÔÇÖre halfway through the summer holidays and thereÔÇÖs still plenty of time (and hopefully sunshine!) for family barbecues and lazy lunches outdoors. But is your garden furniture up to scratch?

Chances are that the gorgeous patio set you splashed out on a year or two back has greyed considerably and is now decidedly more shabby than chic. But you can revive your tables and benches without the need to buy new ÔÇô and hereÔÇÖs how!

1. Blast off any dirt with a power washer and sand the wood thoroughly.

2. With a paintbrush, apply teak oil, which is renowned for restoring wood to its original colour and stops it from greying.

garden-furniture

3. Leave to soak in for one day before rubbing of any excess with a rag. If the wood is very weathered or grey looking, it will need more than a rub down and an oiling, and you might want to invest in a commercial deep cleaner to apply in between rubbing and oiling. Your furniture will soon look as good as new!

4. During the winter months, garden furniture should ideally be stored in a shed or under protective covers to keep it looking its best.

If you decide to paint your garden furniture, rather than applying an oil:

1. Wash the furniture with warm water and sand it lightly.

2. Apply an external primer and allow to dry for at least eight hours before applying a second coat of primer if necessary.

3. Turn the furniture upside down and paint underneath. Allow to dry.

4. Turn the furniture upright and paint the top side, again with two coats if necessary.

5. Invite your friends and family round and show off your upcycled picnic tables and chairs!

Main image: Heritage Gardens

Inset: Design-3000


How to freshen up your front door

front-door

First impressions count, and you can transform a tired entrance is with just a little imagination and elbow grease. Just follow our easy steps and youÔÇÖll be proud to shut the front door!

1. If possible, take the door of its hinges. If youÔÇÖre unable to do this, you can still prep and paint it in situ.

2. Remove the doorÔÇÖs hardware, such as the letterbox and handle, or use masking tape to cover them and any panels that you may want to paint a different colour.

3. Clean the door thoroughly with a damp cloth.

4. Apply two coats of primer ÔÇô an undercoat of paint that will protect your door and prevent the topcoat flaking and cracking.

5. Use a fine sandpaper to sand down the door, brushing away the dust with an old paintbrush.

6. Apply the first topcoat with a brush or a roller, painting with the grain of the wood. Always choose a quality paint for a beautiful finish and durability; cheaper paints can prove a false economy! RonsealÔÇÖs 10-year Weatherproof Wood Paint is drip resistant and comes in 15 classic colours such as Racing Green, Dark Oak and Chestnut, in either a gloss or satin finish.

7. Apply a second and further coats if necessary. The darker the paint, the more work needed!

8. Using a mini roller, paint the inside and top edges of the door.

9. If you have a panel door and want to paint the trims and grooves in an alternative colour, wait for the base coat to dry before masking around and inside the panels. Paint the trim with an angled brush, applying a second coat if needed.

10. Remove the masking tape and screw the letterbox, knocker, handle and doorbell back in place. Polish the fittings and voila ÔÇô your front door is ready and waiting for guests to make an entrance!

Image courtesy of Ronseal